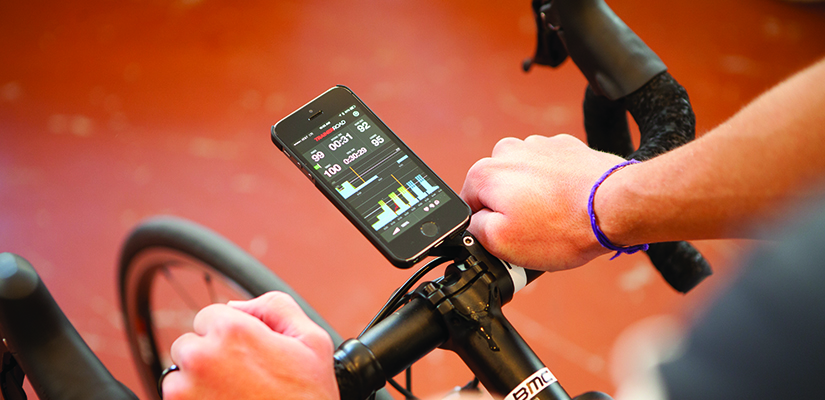
We’ve received a lot of questions about the mount that is used in the videos and screenshots of our iOS app, so we thought we’d take a moment to show it in more detail. The truth is, it’s a homemade mount that came out of frustration of not wanting to have multiple mounting brackets on our handlebars.
Like most cyclists, we already have some type of mounting solution on our handlebars or stem for our cycling computer, but there weren’t any simple phone cases that would allow us to use this mount for our phones. So we decided to make our own, and while we have been toying with the idea of mass producing them, we decided that we would just show you how we made the cases so that you could build them as well!
Below is a list of items you will need and a step-by-step guide of what to do. Before getting into this, please note that we are only making a case with the male half of the mounting interface. In the case of this walkthrough, the mount that is currently on the bike is for a Garmin cycling computer, so we are just creating the male portion of it.
In addition, it is important to understand that these mounts are simple and not designed for outdoor use, so with that in mind, we do not encourage you to use them except for when you are on the trainer. Also, please remember that this is a homemade mount and your smartphone is expensive. This is probably where we would have a voice over guy read through a disclaimer at an incredible rate of speed, but seriously, we are not responsible for your phone breaking as a result of using this mounting solution or for any injury sustained while making the mount 🙂
Okay, with all of that out of the way, let’s look at what you need to make the mount.
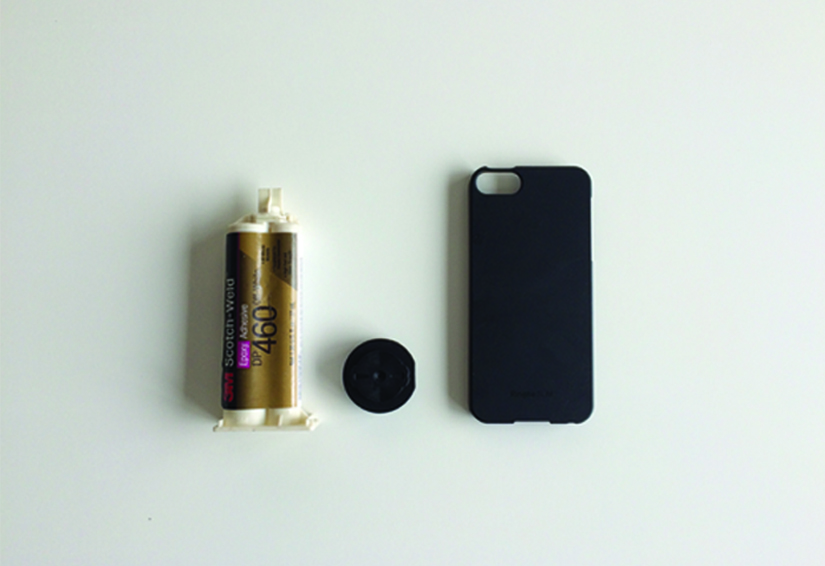
List of Items
- Phone Case (This is the one that we used in the walkthrough, but any hard and flat case of your choosing will work)
- Male Mount (This is the one that we used in the walkthrough since we are mounting to a Garmin mount, but use a male portion of whatever mounting interface you already have on your handlebars)
- High-Bond Adhesive (This is the adhesive that we used in the walkthrough. It is extremely strong stuff and we don’t recommend anything less)
- Dremel or hot knife (We use a Dremel for relative ease, but any type of hot knife can work as well)
- Heavy Grit Sandpaper (If you have a Dremel, then this part is taken care of as well)
Got everything you need? Good! Let’s get started.
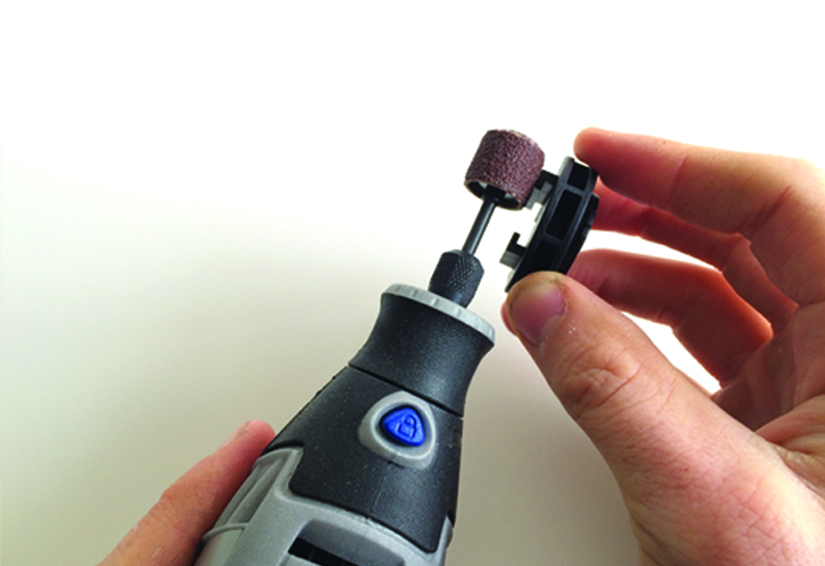
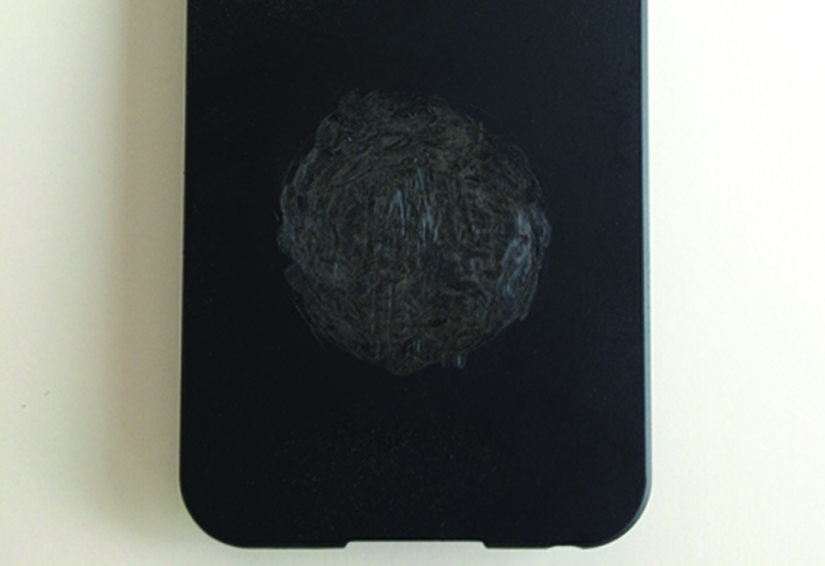
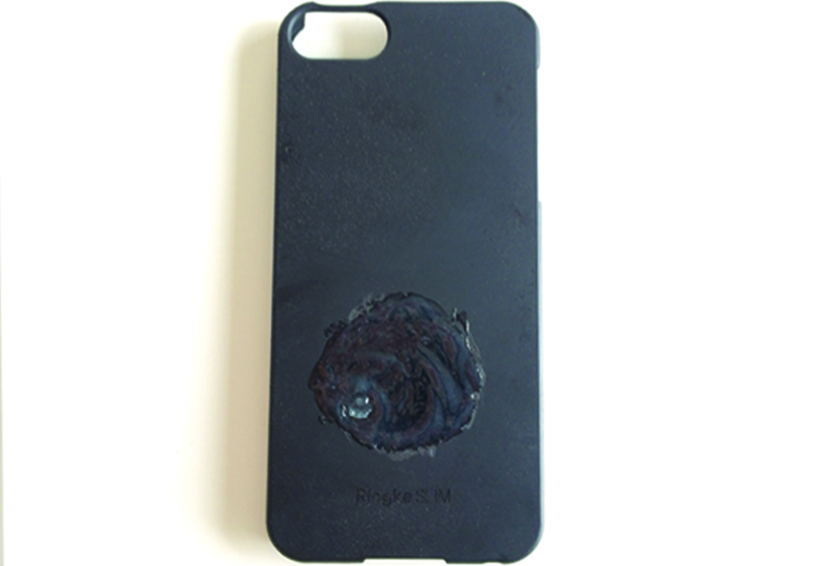
- On the opposing side of the male mount (Item 2), sand off the two tabs that you can see in the following picture so that the surface is flat and rough. Using a Dremel (Item 4) makes this as simple as it gets, but if not, use your hot knife (Item 4) to remove any protrusions and sand the surface so that it is consistently rough with heavy grit sandpaper (Item 5). Make sure you have cleaned the surface of the male mount (Item 2) of any debris or shavings before moving on.
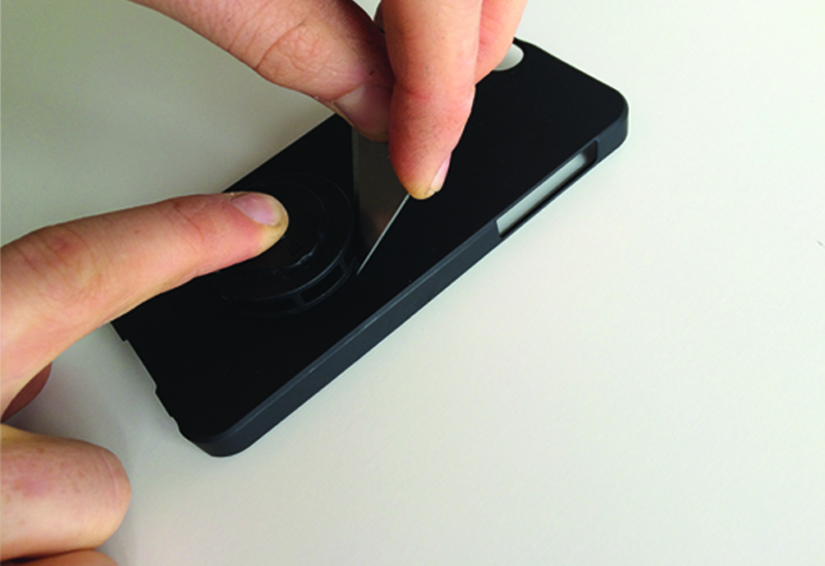
- Place the male mount (Item 2) onto the back of your phone case (Item 1(, situate it appropriately and mark the outline of the male mount (Item 2) with a pencil, pen, or very lightly with a razor blade. In our case, the female portion of the mount that we already have on installed on our bike for our cycling computer extends forward from the bike, just in front of the stem. Taking this into account, we are placing the male mount (Item 2) towards the lower portion of our phone case (Item 1) in order to have adequate clearance between the phone and the stem.
- Using a Dremel or sandpaper (Items 4 and 5), rough up the surface of the phone case (Item 1) within the indicated area from step 2. No need to go overboard here; just make the surface consistently rough. Make sure you have cleaned the surface of the phone case (Item 1) of any debris or shavings before moving on.
- Prepare your adhesive (Item 3). In this case our adhesive was a two-part solution that needs to be mixed together. We did this by dispensing both parts of the adhesive onto a plate and then mixing them with a toothpick.
- Apply a small amount of adhesive (Item 3) to the sanded portion of the phone case (Item 1). Apply just enough so that when it is spread out, it is only slightly more than a thin film.
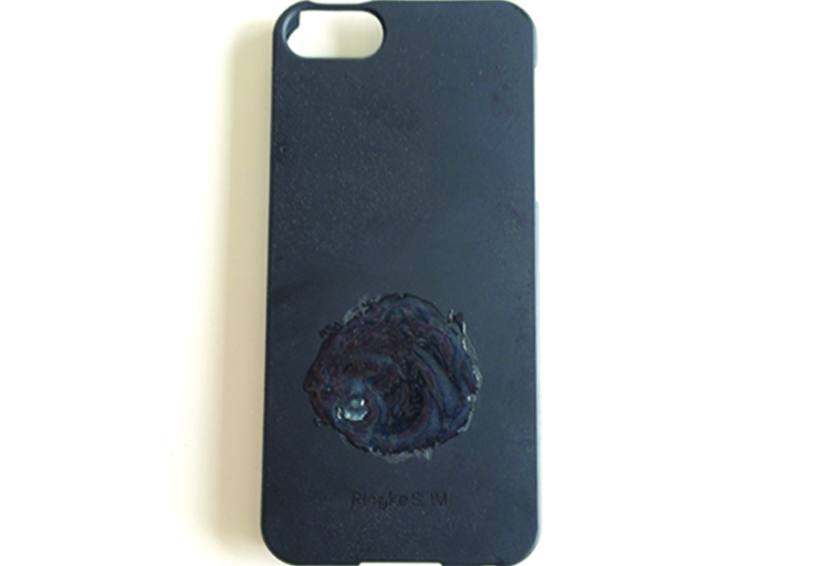
- Apply the male mount (Item 2) to the area of the phone case (Item 1) that has been prepared with the adhesive. Ensure that the mount is attached properly so that your phone will be mounted straight and true when on the bike.
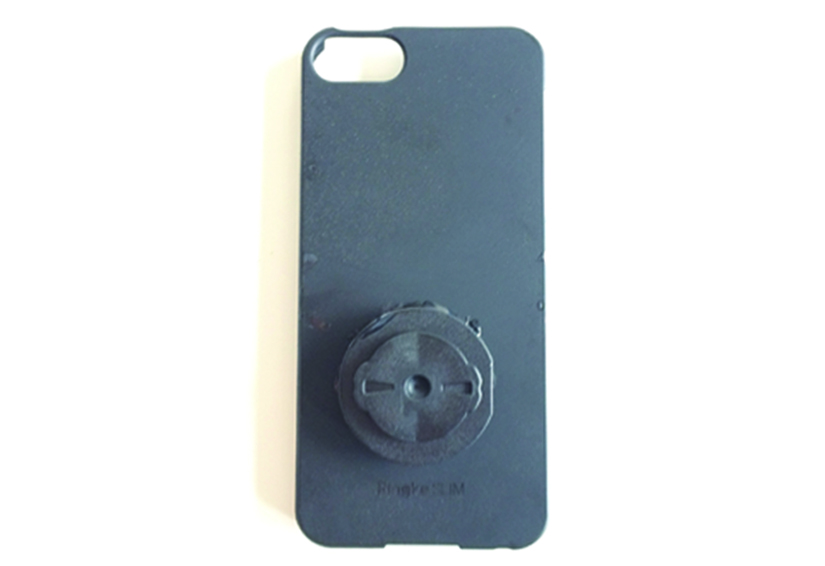
- Let the newly modified phone case (Item 1) sit overnight or for at least 6 hours. Make sure you follow the curing instructions for the adhesive you have used.
There you go! Now you have a way to mount your phone to your bars for your TrainerRoad workouts that is clean, simple and uses the mount you already have on your handlebars.
This type of solution can work for any type of phone case that has a hard and flat surface with a stiff structure. If you are using a different mounting interface than in this walkthrough, try to find the male portion of your mounting interface and prepare it in the same way as this walkthrough indicates.
For more answers to your cycling training questions, listen to our podcast Ask a Cycling Coach — the only podcast dedicated to making you a faster cyclist. New episodes are released weekly.
Share this Post
Brilliant idea. Thanks. LK
Great idea and I’d like to make one. Any idea where I can get a male mount like the one used for this? Thanks!
Yes. I would also like to know where to source the male mount for garmin??
Michael you must have overlooked the hyperlink for the SRAM adapter just as I did. After reading the article again and noticing that link it was very easy to find online. Mine arrived today and I plan to construct the phone mount this weekend. Mine will only be used indoors on my trainer and I’ll use my Garmin 800 on the road.
Great idea. I don’t see a ANT+ adapter on your iPhone screenshot?
Does this male mount you have the link to hold the Garmin 800 too? Only says the 605 and 705 in the link.
The male piece that is already attached to the Garmin 800 won’t slide into our recommended male piece from the post. I believe the male piece that’s already attached will simply lock straight into the linked SRAM Road Computer Mount. 🙂
Hi Nick
It fits the standard garmin standard quarter turn. If you want to buy it off eBay and see if it fits if not just return it.
Greg
You can actually buy the male mount directly without modifications – and it’s cheaper.
https://www.etsy.com/listing/462102291/garmin-male-mount?ref=trainerroad
Wanted to update on making this mount. I had previously used an iphone5 and had a super-thin case on it. That meant it would fit in the mount I made with the attached garmin 1/4 turn male piece epoxied on the back… barely… without removing the case.
Recently, I upgraded to a iphone 6s and have a more robust case to protect it from damage. This makes the phone+case too beefy to fit into another iphone6 case (with garmin mount on bottom). So, the options were to remove phone from my day-to-day case to put it on the indoor trainer -or- make the case with the garmin mount on the bottom the day-to-day case. Neither of these really appealed to me.
Option C, which works great, is to just buy a larger iphone case (I used the 6s PLus) and put the quarter turn mount on the bottom of that. Obviously, this is not a tight fit, the phone just sits loosely against the sides of the case, but it won’t slide off. Basically, it’s just a tray with raised edges. I wouldn’t try using it for outdoor riding, but that’s not the purpose anyway.
Heck ya! Thanks for sharing!!!
Hey, I tried to buy the epoxy adhesive you recommended on Amazon, and it comes with this warning
“This product is intended for professional/commercial use. When you check out, you will be asked to verify that you are a professional/commercial user. Please review the legal disclaimer for this product.”
Do you think it is safe for someone without a lot of experience to use? Or should I get something less strong?
Hey Bruno!
You should not have any issues with the adhesive, but if you are really concerned:
1. Use rubber gloves during the application to make sure none gets on your hands
2. Apply adhesive in a very well ventilated area
If you follow those basic steps you;ll be good to go 🙂
Hey Bruno!
You should not have any issues with the adhesive, but if you are really concerned:
1. Use rubber gloves during the application to make sure none gets on your hands
2. Apply adhesive in a very well ventilated area
If you follow those basic steps you’ll be good to go 🙂
Adaptations for a Wahoo ELEMNT BOLT bike mount and a Samsung Galaxy S7 phone.
Material tweaks:
1. Phone Case: https://www.amazon.com/dp/B01A7ICRLO/ref=olp_product_details?_encoding=UTF8
This is made of polycarbonate (stiff) and is fairly minimalist (easy to snap the phone in and out).
2. Male Mount: https://www.shapeways.com/product/58RK9UU8M/wahoo-elemnt-quarter-turn-plate?optionId=63015906
This is 3D printed from polyamide. Despite the “polished” description, the surface is a bit rough, although that doesn’t affect its smooth operation in all the Wahoo bike mounts tested.
3. Adhesive: https://www.amazon.com/dp/B0044FBB8C/ref=olp_product_details?_encoding=UTF8
Despite the name, this is not an epoxy, but a 2-part acrylic. It’s specifically formulated for bonding plastic, and is recommended for joining polycarbonate and Nylon (polyamide).
Procedure tweaks:
I pretty much followed the instructions above, as well as the instructions for the different adhesive. The main difference is that I put the male mount as low as possible on the back of the case. The Wahoo ELEMNT BOLT computer is pretty small, and some out-front bike mounts designed specifically for the BOLT are correspondingly compact, making for tight clearances when the phone is inserted and rotated. With the male mount at the bottom, this case’s corner just clears the arm on Wahoo’s BOLT aero bike mount. Clearance is not an issue with the K-Edge Wahoo combo mount.
Anyone have a suggested iPhone X case to use for this?
Any plastic wrap around case with smooth surface to accept tape or epoxy On back
KOM Cycling makes a finished product that uses a 3m adhesive to secure the adapter to your phone! No need for all of this jerry rigging.
https://cyclingkom.com/products/universal-phone-adapter
֥ɥ`ѩ`ԩ`ͨȫƷߤƷ|ϟo|iphone8`ԩ`,륤ȥ֥ɥԩ`”iphonecasesjpbuycheap777″륤ȥ?`ѩ`ԩ`ͨ!륤ȥ?`ѩ`ԩ`ХåꡢƷ|LOUIS VUITTONХåԩ`NƷӌT!Υ`ѩ`ԩ`륤ȥХåҊ֤Ĥʤ餤赤ʥ`ѩ`ԩ`֥ƷUӤƤޤ
ͥiphone` http://www.cyclinghalloffame.com/
I used 3m double tape and it’s never Failed indoors very easy to use that way