Hey all, thanks for the guidance on this. I disassembled my Snap, and there was a ton of dust inside where the bearing had broken down. My problem is is that I can’t get either bearing to budge to replace them. Did anyone have this problem and a solution? I’ve tried tapping it with a wooden dowel and a screwdriver, but nothing…Thanks for the help.
Alright, I slept on it and the answer ended up being using a 14mm socket attached to an extender that I was able to pound through the axle hole. It provided equal pressure around the bearing and popped it right out.
I was able to rebuild it and it’s running smooth and quiet again! Thanks all!
1 Like
Mine started out with a sort of knocking noise, then after around 15 minutes a loud crickets chirping sound, sometimes more of a squeal. After looking all over the internet and checking various suggestions, I decided it was the bearings. I did step #2 below and there was a lot of brown dust inside. This forum post seemed to be the best information I found, so I’m posting my results here. This is a long reply but I hope it helps someone. My noise is cured, for now.
I was given a used Wahoo Kickr Snap by a relative. He probably used it a couple years, and I have used it for 2+ years myself, logging around 4000 miles on it. Just for background. The noise started a few months ago and progressively got worse.
I purchased bearings matching the specs of the Timkin ones posted by @MuddyPuddle above, from a local parts place. Mine are F.A.G. brand and cost $17 for a pair.
The steps I followed echo what @idontknow posted, but here they are:
- Remove flywheel dustcap - pried out with knife tip.
- Remove drive side flap - 2 x 2mm small Allen bolts.
- Remove snap ring on drive side - purchased retaining ring pliers ($45).
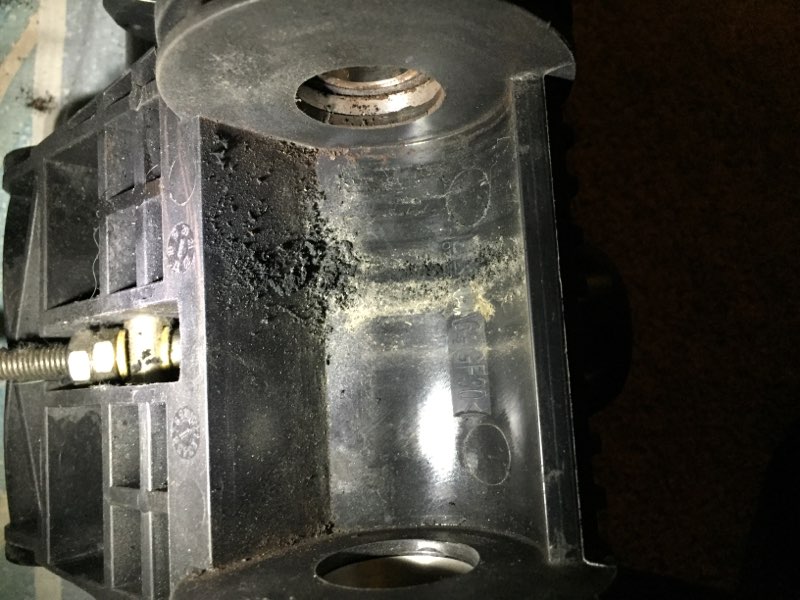
- Optional - pry off rubber seal on bearings using knife tip to check condition on that side. Mine had old gray burned sludge for grease. It might be worth inspecting them before proceeding. There was brown dust all over the inside on the drive side and the inner bearing ring was brown from heat. These bearings were clearly fried.
- Remove roller screws - 2 x 3mm Allen. I used a hair dryer with a metal baking funnel. Wear gloves because it’s hot. Hold the funnel with the wide end up against the hair dryer, and the thin end directly on the hole. I figured this would force the hot air directly onto the bolt. It worked like a charm. 3 minutes was probably more than enough. I timed this with my phone. Make sure the Allen key is undamaged and you have accurate, solid contact inside the screw head. I was most afraid of this step, since if the screw head gets stripped, you’re screwed. It took some careful force but once it broke free, it unscrewed easily. Repeat on the other screw. Leave both screws partially in to keep the roller from rotating on the spindle - see #7. After #7, remove both screws.
- Remove 19mm flywheel nut. One hand holding the socket wrench onto the nut and also holding the flywheel, then smack the end of the socket wrench with a hammer. After a couple good smacks the nut broke free.
- Flywheel then slides out. You do not need to remove anything on the flywheel side other than the 19mm nut. Extend the roller all the way down. Position the roller so that the roller screw holes are vertical. You’ll have to wiggle the flywheel just right to get it out around the frame. There is a “key” inside a slot in the end of the spindle, which fits into a slot in the flywheel. This is aligned with the roller screws, so with them vertical this “key” won’t fall out and get lost.
- Remove the roller screws. To shake them out of the hole one of mine ended up falling in between the roller and the housing, but you’ll find it later.
- Whack the drive side spindle end with a hammer using a screwdriver directly on the spindle end. (Perhaps someone will shudder at this crude strategy). The spindle end is likely frozen into the bearings on that side. On my fourth solid whack the spindle shot right out. The flywheel side bearings remained on the spindle. The drive side bearings remain in their cup. There are two grooves in the spindle where the roller screws align. On mine, the flywheel side bearings seemed to be OK. The drive side bearings were clearly trashed. There was a bunch of black dust inside the roller housing, concentrated on that side.
- Whack the drive side bearing out of the cup on that side. I used a long screwdriver through the flywheel side spindle hole. Make sure you’re whacking the bearings and not the cup. Work your way around the bearing giving it a whack. It takes a lot of whacks. I did not use any Liquid Wrench or WD40 type stuff so I don’t know if would make it easier. I didn’t want to damage all the plastic around there.
- Clean everything - both bearing cups, spindle, housing. I removed the inside rubber seal (pry with knife tip) on the flywheel side bearings and put a bunch of lube in there (bicycle bearing lube). Replacing the rubber seal is just pushing it back in there all the way around.
- Tap (OK, pound) in your new drive side bearings (I put thin lube around the bearing and cup). Align it very accurately with the bearing cup. I put my leather work glove over the bearing while holding it, then started tapping around against the glove until it was seated in the cup a tiny bit. Keep going with harder whacks circling around the bearing until eventually it is firmly seated all the way into the cup. This is a very tight fit. I’m sure there’s an appropriate tool for this, that squeezes the bearing in (something like a bearing press) but this method works.
- PUT THE ROLLER BACK IN PLACE.
- Replace spindle through the flywheel side hole and through the roller. Carefully align it with the cup on the flywheel side and the cup on the drive side. Slowly tap (OK, whack) the spindle end into the drive side bearing cup hole. This is also a very tight fit. I put my fingers on the drive side bearings while whacking, to make sure I wasn’t forcing the bearings out of the cup instead of forcing the spindle into the bearings. I did this once, almost all the way, and then realized I had forgotten #13. I had a spindle and no roller. DON’T FORGET #13.
- Rotate the spindle and the roller until the roller screw holes are aligned with the slots in the spindle, and replace the roller screws. I lubed the threads on the screws first. I imagine there’s a reason these screws are basically glued in there, so this is the first thing I’ll check if problems arise again later. These screws bottom out against the slots in the roller, so it’s pretty easy to tell and there’s no reason to torque on them more than that.
- Align the roller screw holes vertically and replace the “key” in the slot at the flywheel end. Wiggle the flywheel back into place and align that slot with the “key” - the flywheel has a white square at the rim aligned with the slot, which helps. When the key and the slot are aligned, the flywheel pops right in.
- Replace 19mm nut on flywheel side (don’t forget the washer). Torque it down as tight as you can with the socket wrench, then while holding the flywheel and wrench with one hand, whack the wrench end with a hammer until it’s tight. #6 in reverse.
- Replace drive side snap ring, drive side flap, and flywheel dustcap - #1 #2 #3 in reverse.
Note that I did not replace the flywheel side bearings. I imagine it could be done with a whacking method similar to the above. I think a ~1" diameter metal pipe would work to pound them out and new ones back in. Possibly a bearing press is the more professional solution.
Here are some images to give an idea of what’s going on in there, hope they show up.


1 Like
Thinking about this a little more, I think the black dust inside the roller housing is tiny bits of rubber from tire wear.
Posting this here almost a year later to thank kbbpll for their step by step instructions - they worked great! I have been dealing with the loud humming all winter long and finally replaced my worn out drive-side bearing today.
Two additions that I wanted to share are:
-
You should put the spindle immediately in the freezer when you are done with step 9. Doing so will cause the metal to shrink and will make installing the spindle into the new bearing (step 14) so much easier. I fought and fought with mine today before deciding to put the spindle in the freezer for an hour. After that it literally only took two gentle taps with a hammer to drive the spindle into place.
-
If you have a 1" socket you can use that safely to install the drive-side bearing into place (step 12). Place the socket flush with the face of the new bearing and tap the socket with a hammer.
2 Likes
I forgot that I wrote all that up. Those are great additions! Especially putting the spindle in the freezer, that’s a great idea. I didn’t have anything 1" diameter handy for step #12 but next time I do it (?) I’ll find something. A year later mine is still doing well.