Thanks for advice, I’ll throw the titanium on to start with as its on route but will probably end up replacing with what you advise above. Be interesting to see which particular points create the most wear, cheers.
Wow.
I think you spent more time building the rocker than I spent training this month.
Nice work indeed.
Cheers, I couldn’t train today, bit of bad planning! After I’d done the epoxy pour I realised I had to keep movement to a minimum in the garage to keep dust down.
I needed a project with having so much time off over Christmas and being unable to do other things with covid lockdowns etc. Also there’s a chance I’ll have to do a bit of DIY with a possible house move on the horizon. So needed to get up to speed with some woodworking skills. I’m a beginner on that side but enjoy the puzzles and challenge.
2 Likes
Well it’s taken two days for epoxy to cure, diesel heater working overtime in the garage. Going to delay top layer until weather warms up a bit, something above zero outside so heater hasn’t got its work cut out.
Removal of taped plates went well, only a little clean up required.


Had some tape leaks but nothing bad, will secure tape better, use heavy duty stuff when doing top as it will be a denser layer. Also will use clamps from start.


Only a couple of ripples and one little wood chip in epoxy, also some scratch marks showing through that I didn’t see pre pour which really stand out with epoxy. Not too concerned as this will be hidden and a good result for first epoxy pour, plenty of lessons learnt


Overall very happy with results, bottom is now well strengthen and protected. Think I’m still going to give it another 48 hours before prep-ing for top layer.
4 Likes
Temperature not too bad in garage, diesel heater on 70% of max. Decided to try and finish epoxy top coating. Spent the morning prep-ing it. Even so, I still got a leak after pour, I will keep an eye on it over rest of the day, hopefully I won’t lose it all!


2 Likes
That is looking more interesting easy h time you post an update.
1 Like

Not much progress as holidays are over and it’s been back to work. The overall epoxy coating went well, almost level! Had a few leaks around the sides which has made cleaning up a long process. As you can see in picture below. Need to get it backdown to the grain.

I’ve decide against rounding off the top epoxy blue edge with the router, will just curve it over with various grit papers. Very happy with the results, looks like an old pane of glass laying on some wood with that blue tint.

Started to mask off both sides here as I’m going to do the edges in a clear epoxy. Also used the tape to prevent any damage whilst manually sanding the edges.

Goodview of the different epoxy layers here, Blue and Clear with the sanding done down to the wood grain again…

90% of the sides have now been coated with a thin brushed on epoxy coating will have to wait for that to dry before flipping upside and doing the edge along the bottom.
To do:
-Attach Titanium plates
Attach to the steel plates with carpet tape, this is so I can see the wear after advice, so not to destroy the current attached plates. A lot of weight in a small area for those castors. If the worst should happen I am thinking of swapping out the castors for steel size hockey puck shaped discs, maybe running these against the plates on a small bed of grease. Plenty of surface area taking the weight. Just ideas at the moment.
-Attach H3 via arms and underside
Will have to drill a few holes, using thread rods and knob star handle nuts, make some attaching parts to tie down the trainer.
-Attach Sterezo steering to the front
Not looked yet into how I will secure this, but there are plenty of screw holes underneath for current pads so I should be able to come up with something.
Very little left to do but little time to fit in all in, hopefully finished in a couple of weeks.
2 Likes
I agree there are some talented craftsmen [craftspeople?] in here. My V1 was a simple test to see if a little movement helped my comfort. Since it seemed to work and I’m too lazy to go beyond my proof of concept, I’ve been riding like this for weeks without issue.


3 Likes
Nice hack there ![]()
Depending on your preferences, adding 2 more balls into the existing center balls will reinforce the center, and give more “rocking” action since you will have double the support in the middle and encourage more angular rotation, vs what I suspect is more vertical compression with the equal 2x2x2 in the current setup.
1 Like
My V1 has been in constant use for nearly a year for same reasons, 6 bed slats in two banks of three and some wood across with some strapping.

V2 has been in the design phase for a very long time because V1 worked for me. Just a new trainer and having to practice some DIY skills before a possible house move has given me that motivation to put drawings and designs into reality… Enjoy your V1, hope it gives you many more years.
2 Likes
Good idea! Next Amazon order I’ll toss another tube of crappy tennis balls in my cart.
2 Likes
That’s my kind of rocker!
What are you doing under the front wheel? Some type of rocker also or just raise the front to level it with the back?
The CycleOps block has enough room that it doesn’t interfere with the small amount of rocking,

3 Likes
So it was time to mount the trainer, just a little epoxy coating to do on back strip, will leave that for a day I plan a few days off the bike. Thus I still have masking tape on the back of the rocker.
Decided to place everything on the setup rocker plate and mark out that way, not everything is square when it comes to aligning the bike up when attached to the trainer. The frame when attached isn’t perfectly straight with rocker direction, so it was a case of putting the bike in alignment and marking out where everything lay.
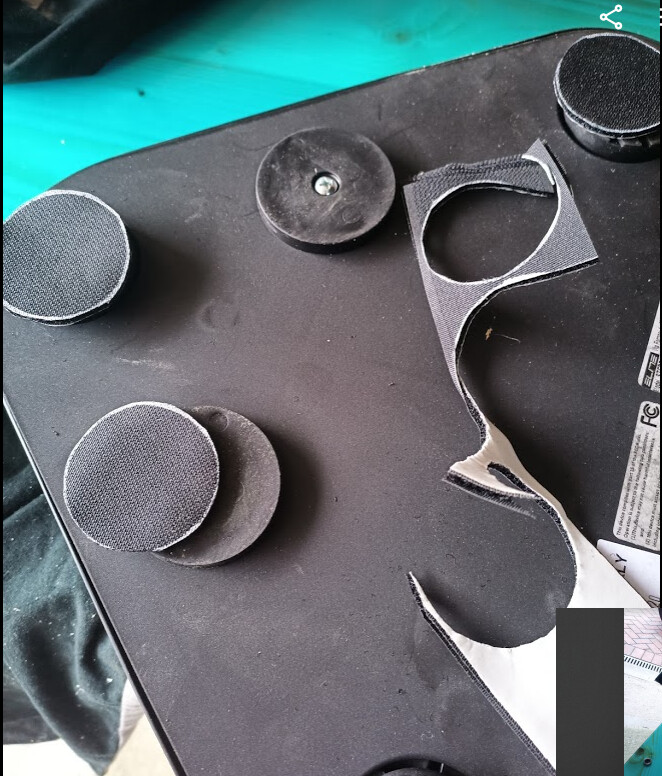
Decide to insert thread rivets as if I went all the way through I would hit the plates on one side. Also decided to mount the Sterezo with Velcro, would be secure enough for its purpose.
So Velcro, carpet tape and place correctly on rocker, worked a treat.


So the plan to mount the trainer arms was to use a threaded bolt with a locked nut. Approx 28mm of free thread up and 10mm to drop in the rivet bolt. A bit in between for tightening and the ‘adjuster’. Then I would just drop it into the rivet bolts, which should be just above the river bolt threads. Then a few turns of the locked threaded bolt to attach, leaving plenty in upper part and secure with the fingered circular Saris bolt.
Picture a few pictures down explains it better!

Only issue with this is the Saris uses Imperial and I was using Metric bolts/threads. Therefore I need to open up the Saris internal arm nut and circular bolt. Works other way around with a very little play but not the way round I wanted it. So it was a case of taping the thread a little.


Then it came to fit, the worrying part, even a few millimetres out would be a pain. Both sides dropped 10mm into the rivet bolts perfectly as planned. A few turns and they were attached, then secured with circular bolt.

Front Sterezo also fitted perfectly

So came the first ride, my impressions.
-
Steering on Sterezo vastly improved, not sure why but now it feels so much lighter and smooth. Probably because its now secured and there is now no movement of the accessory, think I’m on the limit for tyre width there!
-
Rocking motion. Vastly improved on old set up, side springs couldn’t be better, obviously I have little to compare too but it feels good and just gentle peddling you can see that little swaying. Nice and smooth side to side and no effort to remain upright.
-
Horizontal movement, it all moves as planned, had springs at max tightness so took a bit to move, I’m not a aggressive rider. Front and back can move different way, although locked in a way with bike. Front can move 90 degrees right and rear can either stay, move left or right. Same other way. It obviously has to move forward at the same time but again in different directions if that’s what the forces are telling it.
I can already feel the castors railing to the grooves they are making, the titanium plating must be already marked. Lot of pressure in those points on the castors. Thus it feels like it’s harder to initially move out of the grooves its making, not what I want. Might try to loosen the springs. But I think the next stage is to decide whether to go for harder plates or the Hockey Puck steel disc with grease idea, or a mix of the two. Might try flattening the titanium plates down as there was a bit of gap for the carpet tape which obviously wouldn’t have helped. When I take it a apart again I will assess.
Overall I’m very happy with the movement, the upgrades might have to wait a while as house move is on the horizon.
Excuse mess and dirty bike, no excuse ohter than lack of time!

3 Likes
That all sounds great and super interesting. I’d love to see a video of the movement if you’re willing to share. Mega props on taking a very different path. So cool. ![]()
1 Like

Cool. Care to share more details on construction method and materials?


I used two sheets of 3/4 play wood. I cut them to 5’x3’.
I cut strips to keep the tennis balls in assigned areas.
Due to my size over 200lbs I am using a few more balls.
I put floor leveler down since the sump pump is 8’ from the platform and it had an 1" of fall.
I tapcon’d the bottom plywood to the floor.
The 2x6 go around the platform so the top plywood floats on the balls.
2 sheets of plywood are $`100
Floorlever is $50
Tennis balls $30
Only thing left is to paint and I am going to bolt the trainer through the plywood rather then ziptie.
I can only ride standing up right now and this is amazing. Works great
5 Likes


