I download the manuals as PDFs when I find them. Also keep a folder of set up notes and links to good you tube videos (copy the URL into notepad or word doc).
Eventually you’ll be wrenching at midnight or 4am and will want to find the manual or video tutorial without googling around wondering where that perfect video you watched is.
Since you are in the RV, and might be some distance from parts at times, it would be worth having some spares for stuff that can go wrong and which a shop might not have. Or, it’s Saturday night and you want to ride Sunday morning.
Brakes are a key. In addition to spare pads and bleed kit plus appropriate fluid (oil or DOT), I keep a few barbs and olives on hand. Along with the hose cutter and the little driver tool for Shimano barbs. Consider getting a pad separator tool as well. Because who doesn’t collect tools and eventually you are gonna squeeze the brake lever without a pad spacer or brake disk between the pads. Watch a video on how to free a stuck piston and how to get all the pistons moving freely Centering disk rotors can be easy or maddening. Since we love tools… the small Knipex Pliers-Wrench with smooth face is great for disk rotor truing.
Keep the parts on hand to rebuild your suspension and dropper post. Fork seals and oil, slick honey or suspension grease, that sort of thing. It is amazing how much better these sliding components worked when well maintained. For fork seals, get a tool like the PUSH Industries seal setter. Don’t get the cheaper versions that don’t stop and which let you bang the seal in too far. Some folks like the Pedros “spoon” tool / tire iron for popping seals. There are other ways that also work fine.
Derailleur cables and housing spares, and if your bike has complicated internal routing get one of those magnet and string kits for fishing lines through bike frames.
Spare chains and links are a must. Get the plier like tools to open and close the master links. I carry the wolf-tooth combo tool on trail.
To keep small parts and tools organized (like bleed kits and suspension parts) I like the Plano utility boxes. Different sizes so big ones for stuff that stays in the shop and smaller ones for “kits” i might take with me to a race/ride or on a longer weekend outing away.
If you can borrow a ShockWiz for suspension set-up it will help you and your SO get your bikes dialed. Suspension setup is a mystery for many many many riders even though most won’t admit it. Like me. I’m a suspension wizard (as long as I have the shockwiz).
You’ll need snap ring pliers for some jobs. Might as well get a small pair now before you need them. Some picks are useful too when playing with seals and retainer rings.
Torque wrenches are useful. Buy good ones with good sockets and use them. The expensive parts will be happier.
Pivot bushings and bearings. Very doable for a decently skilled person. Key is patience and never to force anything. It might be worth watching someone do it first. Sort of the see one, do one, teach one method but for bike repair instead of surgery.
Clothing - I’m a roadie. I rode mountain bikes in lycra for decades. Then I learned about lightweight elbow and knee pads and padded liners (protective not chamois) worn under baggies. Changed my life. Still wear road jerseys a lot, but with just some minimal protection, now when I crash there is less skin loss and less bruising. Didn’t care much in my 20s but now in my 50s things hurt more and heal slower.
Hope that helps. Do the basics and then add the fancier stuff as you go.
On Edit - Something I want to do, and wish I’d done earlier is take some lessons. Eventually everyone wants to know how to corner faster, bunny hop, do drop offs, jump a little bit and manual (wheelie). If coming off extensive road riding, you’ll have good skills but perhaps not the right skills or confidence. It’s worth connecting with someone good to accelerate the learning curve. I got lucky and after years started riding with some pro enduro guys. Wish I’d thought about skills instruction sooner for dirt. $0.02 on that and perhaps its a different thread. Tons of great you tube content but sessioning with a coach or experienced rider is gold.
Sounds like you are on the right track. Internal width of your rims will make a difference in the shape and final width of your tires as well, same basic idea as road bikes but everything is a bit more exaggerated since tires are so much bigger.
FWIW, I am about 90kg and run 2.25 rear and 2.35 up front on my XC bike. I think that getting your suspension set up dialed will likely have a bigger impact on your ride than putting a bigger tire up front.
The main advantage to running a larger tire is the traction you gain by being able to run lower tire pressures. Going from a 25 to a 28 on the road bike feels plush but I am not sure it could tell the difference on my MTB based on ride feel alone. If you have wheels with a 25 or 30mm internal width, a 2.6 inch tire might not sit well on them or have great handling because the sidewalls are more prone to squirm with less support.
You can run pretty low pressures on your current set up and, to me, it seems like a shame to throw chunky trail tires on a race bike like that. If you really want to bash it hard through rock gardens, add tire inserts for some peace of mind but a 2.4 tire like the Rekon is a pretty capable set up regardless of body weight.
Love it. I’ve got a file of PDF’s as of yesterday. And a Todoist sub-list of useful videos and links. Many from here!
I feel seen.
Okay now I really feel seen. Just dropped $1500 on spare “stuff” in the last 48 hrs. All shipped to the RV park we’re staying at because it’s the first time we’ve had an address in a while. Goal, never need to postpone a ride because I don’t have the thing. Gonna go through it anyway.
Still working on getting amazon to make GPS-coordinate-based deliveries!
I feel like you’re sitting there reading my purchase history from last night. Except… what’s a barb and olive?? Got the pads and bleed kit and fluid last night.
Same as housing cutter for road bikes with mechanical shifting and braking?
Hmm… dunno what a barb is. Want to link? Want to also link to this tool??
ALMOST bought yesterday. Decided against because frugal and my paint scraper tool + screwdriver worked okay but I’m betting that I damaged the pads… so maybe I ought to.
PS. Als.com is having a 20% off sale right now. I bought all their Ultegra 11sp and Sram 12sp chains though. Sorry in advance! Code for 20% off: 100YEARS (no affiliation… but I did get 8 chains for the price of 3-4 anywhere else. We’ll see if they come through on delivery.
Just purchased. Been eyeballing for almost a year.
No idea how to use or what it’ll be used for but your other recs are spot-on so it’s in my “saved for later” on Amazon.
I have similar and love them.
Got plenty for wife’s road bike. MTBs are AXS. TT bike and my road bike are di2. Kicking myself for getting mechanical for Michelle at her request.
It does. Could you link to what you mean? I’ve never heard of this. Sounds like a headache-saver.
Check. Check.
What context would one need to open the quick link out on the trail? The only context I’ve had for chain repair has usually required a chainbreaker and then install of a quick-link, but no uninstall of quick link. I’ve spent 90% of ride time on road. 10% on trail with outmatched gravel bikes.
Interesting…
Got’em 2 wks ago!
Roger!
Tools needed here different than a bearing press? I’ve got the wheels manufacturing one. Along with some Hambini bearing tools on the way. I plan to make these bikes last and do all maintenance since we’re on the road so much.
Shoot, I’ve succumbed to avoiding road rash at all costs. Don’t have time to manage it. Padded liners under baggies? Can you give me an example of what an outfit would be? I’ve seen the baggies… not so much the liners.
Taking recommendations here! Can travel! Tucson now. Meandering northwards through mountain or coastal states until July. 100% agreed re: lessons.
In 2020, I paid for a day of mechanic lessons from a local guy (Dan @ Snohomish Bicycle Centres!) who also does some work for pro MTB team(s?). One day took me from “can pump tires” to “can take apart and reassemble wife’s race bike and wheels.”
Interesting. Will heed this wisely!
Ours are 30mm. Good to know.
Sounds like you know what you’re talking about here! I’ll definitely race on different than what I ride on too. I’ve thrown out race-performance on our road bikes for training, in exchange for never getting a flat. Time-cost of flats just got too high. We race on GP5000’s or CorsaSpeed G+ 2.0’s but train on Gators haha. I may take a similar shameful approach to MTB’s if we have ANY flatting issues.
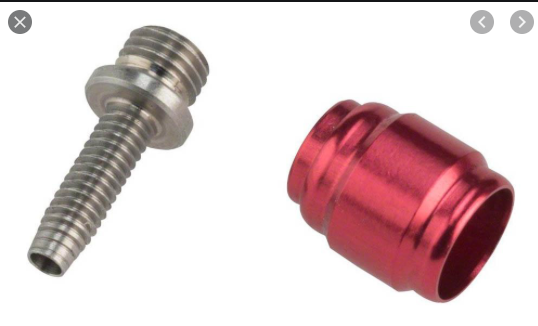
It’s a compression fitting at the end of the hydraulic hose. There is a little barbed piece that goes into the hose, and an oval “olive” that is getting compressed onto it when you tighten the nut on the outside. The barbed bit is a PITA to get into the hose (with shimano brakes), hence there’s a special tool for it. You can’t really reuse the barb or the olive, so if you have to install a new hose or shorten it or anything, you need new ones. (To clarify - you can connect and disconnect the hose with the same fitting in place, but you can’t transfer the fitting to a new hose.)
I have a spcial cutter for the hose, you want a sharp cut without compressing it. Not sure if the cutter for mechanical cable outers would do, think I’d avoid using it for that.
The end of the brake hose that goes into the lever is a compression fitting. The “barb” fits into the end of the hose and the “olive” is the part that get compressed against the lever body and the hose nut.
The hoses are plastic and you want to cut cleanly and 90 degrees with a sharp razor blade. Can be done with just a blade, but having a tool that holds a blade and pushes it through at 90 degrees is nice. Don’t try to cut hydraulic hoses with diagonal cutters or cable cutters like you are used to. Sharp blade.
Shimano “barbs” are pushed into the hose and the olive floats. Having a little driver tool to push the barb in is nice to have. Can hammer it in but tool is easier. SRAM uses a different system where the barb is threaded into the hose and the olive is threaded onto the barb.
Jagwire makes the hose cutter and barb pusher (Needle driver 2.0). There are knockoffs for less money on Amazon which work fine.
Some pictures below and then just check videos for brake hose shortening and it will all make sense. Also, the end of the hose at the caliper has a Banjo fitting, bolt and sometimes and O-ring. The shimano hose replacement kit shows all the parts.
Pad separator tool - You want area and no sharp edges. If you push a screwdriver into the pad you can gouge it. Not the end of the world but pads are not cheap. You definitely don’t want to use screwdrivers on the pistons. If you damage or crack a piston then you get to rebuild the caliper and that is a fair amount of work.
At some point the pistons will stick and you’ll want to work each one separately to free them up. You need four hands to do this well so expect to use up a spousal favor!!!
Here is a Park Tool video about sticky pistons and how to keep them working smoothly:
The big ones are great. They fit the big nut on a Reverb dropper post too. These suckers are in every pro tool roll.
Seal driver - Yes that’s the one.
Hose / Cable routing magnetic string tool thing from Park (I don’t actually have this because I’m stubborn and like fishing cables around with bent spokes. I should get the damn tool):
Never had to open one, but the Wolf Tooth pack pliers do both on and off so if you ever want to take the chain off you could - LOL
Should be good. Find a video of someone doing the bearings and pivots on your bike to learn the tricks. They are all different from easy to pain in the butt!!! Might need a specific drift or puller.
Padded / Protective shorts / hip protection
Lots of different types from body armor to very light weight. I like 7-Protection and Leatt stuff. The G-Form is very lightweight and more XC oriented. Any baggies you like over the liners. I always seem to bash my elbows and hips. Have taken to riding 100% with light G-form elbow pads and the protective liners. knee/shin guards depending on the ride and what we are doing. For sessoning jumps and practicing tech stuff or doing bomber runs down hill the guys will go with full face helmets and some are wearing upper body protection. I’m still more of a XC / Trail guy so the elbows, knees and hips good enough so far.
Take a look at the Leatt “protection” page and you can see the simple stuff all the way to full on downhill kit.
Coaching - Only know the big names and no experience with a selection of coaches and styles so can’t really recommend. Lee McCormack is probably the best known. Am sure guys out west will pop in with names. While going north make sure to go through Park City Utah and hit the famous trails and all the new flow stuff that Deer Valley has built.
Suspension set up, tire pressures and stuff. This really makes a difference. When you get the bike dialed you’ll be all smiles and they really do ride differently. Take notes on what works and what doesn’t. Lower pressure is amazing and if coming from a road back ground its hard to get head around just how low you can drop it. I’m on 27.5 2.5 WT Maxxis tires on my “trail” bike and at 145 pounds am running around 18 PSI.
For suspension, sag it properly, set rebound and compression to the manufacturers starting point recommendations, don’t be afraid to play around and take good notes on what you like and what you don’t like. The FOX series “Dialed” has some good videos. Dialed is bikes and “Academy” is motor sports on the FOX you tube page. In the last several months GMBN Tech show has had several videos all about suspension, how it works and how to set it up. Its a rabbit hole good for rain days when stuck inside.
I used the shock wiz on a couple bikes. Team sponsor loaned me one for a couple months. It wasn’t magic, but did help this novice narrow in on a better set-up. Also helped me learn more about how the adjustments and tokens / volume spacers all worked together. Absolutely not necessary, but I found it to be a useful tool.
Think we hit most of it The forum has a ton of experience and solid mountain bike guys and gals so might get some divergent opinions on some stuff. Folks get very picky about kit and bike set ups !!
Not too many scenarios where the quick link pliers are necessary. Usually in those types of situations you’re breaking the chain with the chain breaker and putting in the quick link as you mentioned. My buddy did just have to do this and made the mistake of putting in the quick link upside down. Since he had a tool with quick link pliers he was able to fix it haha.
Totally agree! Was a pro mechanic who showed me his Knipex tools and I was immediately drooling. Asked price, and stopped drooling for a bit. ha
Okay I’ll shamefully admit that this has happened to me twice and I could have used the pliers bigtime. I like to think I won’t make the mistake again but perhaps self-assessment here is poor. Beyond doing something mechanically unsavvy I can’t think of a time I’d use it but I may get it anyway.
Thank you very very much for such detailed notes here. I’ll attempt to pay it forward but this has been high value!
Totally agree. I have this exact setup for our ultra road rides that extend overnight. Bases are covered here. Good thinking and thank you for looking out!
Okay pair of related dropper post questions:
My wife has the reverb AXS dropper post. Monday it worked as intended. Tuesday, it was depressible without pressing the button. It would lower as if the button was constantly being depressed. Any normal sitting load now lowers the saddle without button-press. It also doesn’t stay down anymore.Why? The only thing we’d done between Monday and Tuesday is set up the AXS app on my wife’s phone.
Does anyone make a dropper post that is depressible without sitting on it to make it go down? Seems like if you’re going to run a dropper post in an XC race you don’t want to have to ride it down to the bottom position, and then effectively do a squat to stand up out of your very low seated position. Seems trivial, but in my limited cyclocross experience… doing something like that when you’re already redlining seems like it could really put you over the edge. Maybe I just need more fitness.
I found the Five Ten Pro much better than Freerider for longer rides due to better sole stiffness. The Freeriders cut off my circulation with consistent pressure on feet/pedals.
Bingo! Thank you. Took me a while to figure out how to get it out of service mode and into normal function mode. First few minutes, it just went into “not a dropper post mode.” Guess I’ve got more reading to do. Thank you!
In practice, this is not an issue. You’re moving around so much on the bike anyway, one more squat to lower the dropper isn’t really noticed. And the little bit of additional effort is totally worth it if it allows you to descend a little faster and safer.
In addition, many XC bikes have shorter travel droppers, so you’re not dropping all the way to the seat post clamp.
I think you (said with loads of respect and some humor) underestimate the lack of fitness possible in a former elite bobsledder with a training frequency of sometimes nil per week.
Good thing the dropper is on my wife’s bike. She’ll be fine.
If you have tire ideas maybe throw them on that thread to keep things coherent.
Yesterday, I patched a sidewall puncture in an Ardent Race rear tire. A couple weeks ago I dealt with frequent tread punctures and sidewall pinch flats in my Aspen so “upgraded” durability to the Ardent Race… and no luck.
I ride as much Enduro stuff as I do XC stuff, and all kinds of trails. Maybe just simply riding my XC bike as my do-it-all bike is silly, but I used to ride hardtails downhill so it feels plush and cushy!
Other questions I could use a hand with:
How long will dynaplugs hold? I patched a sidewall tear/puncture with 3 fat dynaplugs because I didn’t have a tube on me (stupid. will fix.) That patch job is still holding though it took a miracle and my best maneuvering of plugs, tire, and sealant to get it to hold. It held for 14 miles back from the point of flat. I rode gently. Should I expect it to hold while riding aggressively?
Do you ever replace dynaplugs with something more robust like an internal patch of some kind once you make it home? If so, what do you use?
When putting a tube in on trail, do you remove dynaplugs? Thinking yes, because some are pointy! Do you need some other patch or Gorilla tape to keep the tube from protruding out the tire hole, or is the PSI low enough in MTB that it doesn’t matter? (I’ve been running 24-26psi front, 27-31psi rear.)
I’ve read the Tire Inserts for XC Racing thread. Are tire inserts pretty much standard issue equipment for trail/enduro/DH bikes now? If so, I’m definitely putting them in my tires and probably my wife’s.
Are there larger, more robust patches for big punctures/tears in MTB tires than dynaplugs?
If you put a spare tube in, while on trail, do you take the tube out when you get home and use a patch of some kind to convert it back to tubeless? Or, once a tire needs a tube, it needs a tube forever?
 Goal, never need to postpone a ride because I don’t have the thing. Gonna go through it anyway.




 The forum has a ton of experience and solid mountain bike guys and gals so might get some divergent opinions on some stuff. Folks get very picky about kit and bike set ups !!
