Rocker Plates for Trainers

Great, thanks! Will give that a try.

1 Like

Cheap hack to determine what, if any, difference a rocker plate might make to my set-up.

Some background. I’ve got a Saris H1 (Hammer) and use the TR desktop app on my laptop (erg mode, powermatch and EPM enabled). I’ve developed a pretty smooth pedalling technique over time but I’ve got a slight biomechanical imbalance. I’m not sure if I’ve got one leg slightly longer than the other or a slight curvature of the spine which manifests itself as a leg imbalance. Out on the road this doesn’t seem to make much difference, due I suspect to the freedom the bike has to compensate for matters with its natural lateral movement. On the trainer, however, which is fixed, it’s a different matter. I always feel as if I’m not quite as efficient as I could be. Hence my interest in looking at a rocker plate.

Having spent the past few days reading through this thread, watching You Tube videos, and studying some of the many plans on @mcneese.chad’s Facebook group page, I decided to do a quick hack before going down the full DIY route.

All I used was some 13mm thick foam pipe insulator under each foot of the trainer, some small pieces of wood for additional support, and a screw-on leg borrowed from my Ikea desk for central support beneath the main body of the trainer. Fortunately, there’s a concave area under the Hammer that proved perfect for accommodating the Ikea leg. I had to experiment a few times with the amount of foam and the wood support under the right foot of the trainer to address the imbalance caused by the flywheel before I got it right.

I did a short test ride and wow! What a difference such a simple hack has made. My position on the bike feels much more natural, as does my pedalling. The trainer responded almost immediately to power changes (due to smoother and more efficient pedalling), and it felt so much easier to produce the required power and to stick to the power targets. I cannot believe how much difference such a simple hack has made.

Thanks to everyone who’s contributed to this thread for providing me with the information and inspiration to give this a try. Now for the full on DIY approach.

Since trying the above set-up, I’ve made the foam and wood more secure with velcro and gorilla tape, ready for this afternoon’s workout.

Here’s a short clip of it in action:

3 Likes

Awesome!!! Looks like a great.hack and so great thay you have such a positive experience right away. I appreciate the info and details of your experience. :smiley:

Are you planning to just refine this setup or go further and do a full rocker?

1 Like

Thanks Chad. Some great tips and advice on here and your Facebook group page.

I’ve just made the foam and wood supports more secure with some velcro and gorilla tape in readiness for this afternoon’s workout. I’ll see how things go and then make a decision. If it works fine as it is, why fix it, right? If not, I’ll start planning a full DIY job.

2 Likes

Plate is done. Finish is craptastic cos I did it with shellac at first but that’s not waterproof. More sanding and waning enthusiasm later just get it done and call it good.

Made to fit a direto and bosu balls I had lying around. Simplified to 3 planks since I don’t drive and needed to transport the plywood easily.

2 Likes

So, now I’ve had the Omnirocker for a couple of weeks and have put in 25 or so hours on it (rides from 1 hour to 3 hours), I thought it would be good to expand on my first impressions.
Firstly, I have to say I really love it. The sideways rocking and fore/aft movement just makes such a huge difference to riding the turbo. It is not just more comfortable, but also more enjoyable.

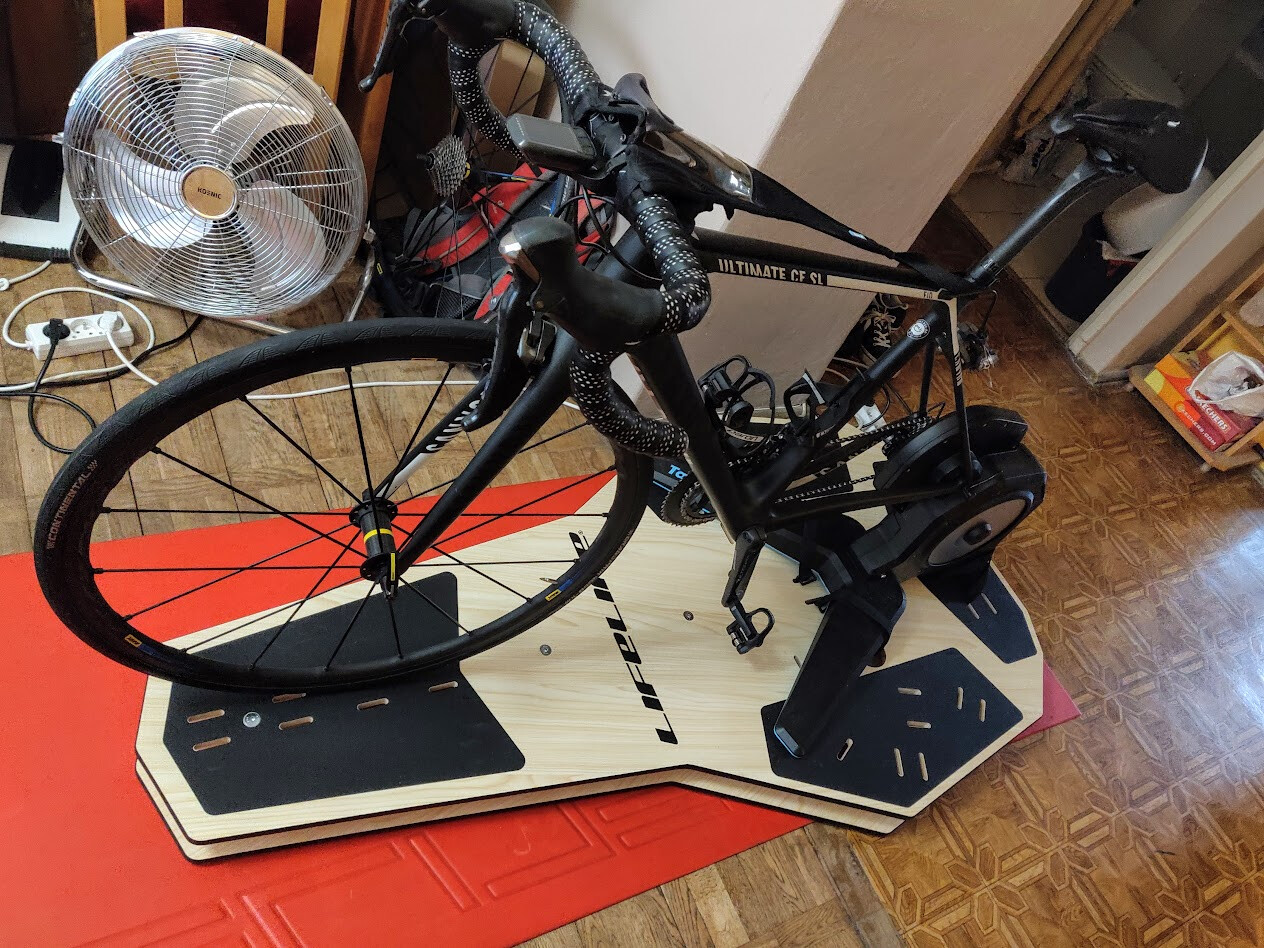
The quality of the build seems to be fantastic. The boards are fantastically finished and all of the parts seem to be really good. One really good feature is that there is a spirit level built into it, so its really easy to get the set up balanced. I’ve got the trainer positioned so that the bike is perfectly centred, and have used 2 2.5kg weights as counterweights to the offset weight of the trainer. The balls can then be evenly inflated so the feel of the rock to either side is the same.

It wasn’t cheap (although a lot less than the saris one), but I’m really happy I paid for it. I don’t have the time, space or equipment to have made this myself. I was worried that I would feel that the investment wouldn’t feel like good value, but it improves the trainer experience so much that I think it was definitely worth it. If you are thinking of buying a rocker (or, probably more fun, building you own) you definitely should.

One thing that I was surprised by is how full on sprinting feels. Most people say that sprinting on a rocker doesn’t feel great because the movement of the bike on the rocker is the opposite to what you would get the road. I’m very much a full body sprinter, and actually found that because I am actively employing my upper body and core when sprinting that the bike movement is inline with how it would be on the road. If you don’t engage your upper body and core then the movement will be sloppy. Interestingly, my trainer peak sprint power is now quite a bit closer to what it is outdoors (about 150 watts difference, compared to around 300 watts difference on a fixed trainer).

4 Likes

Nice, I always liked the look for the narrow lunber cross builds. I need to make one like that sometime.

Get a trde on that and let us know how it goes. :smiley:

Awesome report! Great to hear you are loving the experience so much. :smiley:

Totally agreed on sprinting (and all standing use) that tou must take firm control to get proper use of lean to pedal timing. Inude a proper low pressure in your leveling springs, and it all feels rather great IMO.

It may not be a perfect replication of outside riding, but it’s sure a lot closer than rigid trainers.

From everything I have read on and seen about the Omni Rocker, they have a great design and build quality.

Thanks again for the detailed report. Happy rocking!: D

18mm ply should be fine. I used that for mine.

2 Likes

I used 18mm ply from B&Q. Works just fine

1 Like

Just collected my first rocker plate today, set it up and had a quick test ride!

First impressions are it moves far to much for my liking, I was hoping it would just give a slight side to side movement but I am literally leaning over to one side then the other and it feels rather strange! I have added some foam pads between the sheets of wood reduce the amount of movement for the time being.

Now this has me thinking, is the combined weight of me and my trainer to much for the rocker plate inflatable balls to support correctly? I added around 5psi in each ball and looking on line this is probably to much as it is! cant imagine going even lower pressure, any higher I think they will burst.

The rocker is a Turbo Rocks Realplate+ I had the front end trimmed off to fit the Wattbike.

Considering the Atom weights 44kg, and a bike smart trainer is around 32 kg (about 9kg for the bike and 23kg for something like the Kickr), you are a bit heavier overall. Seems a lot of that mass will be lower around the BB height, so I don’t think that will lead to a massive difference in overall control. That said, I do think that more pressure (or different setup I will share further down) may be appropriate for a smart bike setup.

My quick suggestion for first time rocker users is to move the inflated balls further out from the pivot. In this case, deflate and relocate them to the very end of the plates. Align the ball so you can reach the valve hole from the side and inflate. You can start at the very edge, or place it a bit towards the middle, with just enough reach to inflate them. Placing the balls wider will increase their leverage, and make the same pressure you were using on the inside, more effective. This eliminates the risk of over-inflation and popping.

Start with that and get used to the the motion. If you like it after a few rides, you can reduce the pressure and/or move the balls closer to the original hole location. Much of this is just getting use to the fact that a formerly solid object is now movable.

Also keep in mind that YOU are in direct control of the lean angle at all times. Your application of forces, largely through the handlebars (but also the seat and pedals) will impact the lean angle. You must take control now, vs the passive riding we had previously used on rigid trainers, and make the bike lean (or not) anytime you want.

Let me know if you have more questions. Hopefully this can help you get used to the motion and start to like it :smiley:

1 Like
  • You likely have too much pressure in the balls.

If you are trying to make the feel very stiff, you are better off to move the balls to the outside edges of the plate. Just set them with the valves to the side for easy inflation. You don’t need the balls in the holes to be retained properly.

The stock location for the LL ball holes are quite narrow and may be most appropriate for more advanced rocker users that like a loose feel.

1 Like

It usually bottoms out when I step onto the edge of the rocker. I just used the pump provided to pump the balls, so no idea about PSI. Also it’ll feel a little different on each side, as the pressure is higher on the left to counteract the weight of the flywheel.

I might get around to letting the balls down and counterweighting the right-hand side at some point. I’d then be able to inflate both balls to the same pressure. However having the left firmer than the right is working ok for me for now.

As for adjusting, I find it much easier to let air out than put it in. To fine-adjust the pressure I leave the lever on the pump head open and just press the needle into the ball and pull straight back out again - lets a tiny bit of air out. Doing the same with the the lever closed allows air to escape for a few seconds, which you could do if you’re not close to where you need to be.

Thank you for the advice, I have accepted it will take me some time to fully get used to the rocking motion as my cycling style is more like bull in a china shop so I do lack some finesse.

After completing a 90min session last night I am feeling sore in places I dont usually feel sore :joy:

I have just added one of these each side at the edges, the platform is much more stable now so I can gradually lower the air pressure over time, fingers crossed I will be using full motion in a few weeks or so. To be honest with it set up this way feels great as I still have a decent amount of tight side to side movement which is what I was looking for anyway rather than a huge amount of loose movement.

1 Like

Good deal. For sure, rocker setup is a very personal thing. Some like them barely mobile (but even then it’s a big improvement in comfort compared to rigid) while others (like me) have them loose enough to feel almost like rollers.

With my pure leverage rockers, I would sometimes set the pressure higher for the tougher workouts, so I didn’t have to spend precious energy and focus on balancing. Then on the longer or easier rides, id loosen it up to encourage more motion like riding outside.

1 Like

Because of this treat I ordered my first rocket plates from Wiggle (LifeLine). I did it today so I have to wait about a week for delivery. I hope I will reduce my saddle soreness and joints pain I feel after long session on a trainer (I don’t feel that way outside). We will see. And remember, if it doesn’t work it will be your fault :laughing: :rofl: :joy:

1 Like

LOL, willing to take the blame (or credit) :stuck_out_tongue:

Let me know if you have questions on setup. I should do a longer post, but from the many recent implementations of the LLRP…

  1. The very narrow hole placement for the inflatable balls may be more “active” than some riders want, especially new riders. Be willing to place the balls at the outer edge of the plate, with access to the valves, and inflate there. You will get more support for lower spring pressure.

  2. Consider adding a counterweight to the right side. 5kg [10lbs] are the common weight we see working well. This gives more equal inflated pressures, and makes the plate lean with equal force to each side.

Let me know if you have more questions, because my whole goal is to give people the best possible experience and chance to get the most from a new rocker install.

2 Likes

Thx for the advices. If I have any troubles with the set up I won’t hesitate to ask you for further advices. I’m a pretty light rider (~64kg) and I want to set up it with Tacx Flux 2. I just can’t wait :slight_smile: Here, in Poland where I live, the weather is just crazy this time of year and 95% of my rides I do on the trainer (10-12h in a week) and it will be look like that for the next 3-5 months. I hope the rocker plates improve my training experience. At least my wife use the trainer too and she feels significantly higher level of discomfort so I justified this purchase easly :innocent: :joy: :stuck_out_tongue:

2 Likes

@Lhowles

My first build. It’s a fairly basic affair but I’m pretty pleased with it – especially given that I’ve got next to zero DIY skills. Ideally, I would have built a full length rocker but I’m limited for space.

I originally intended knocking together a rocker based on Chad McNeese’s Rockit Launcher. However, the more posts on Chad’s rocker plate Facebook group page I read, and the more photos, videos and plans I studied and watched, the more ambitious I became. The group really is such a superb source of knowledge, information and inspiration. If you’re interested in building or buying a rocker plate and you’re on Facebook, I recommend you join the group: Rocker Plates | Facebook

I’ve done a series of short tests on my rocker and a couple of full workouts. Since the photos (below) were taken, I’ve moved the trainer more to the left, thereby placing the bike closer to the centre line. This means I can only partially extend the left leg but it’s not a problem. Following Chad’s advice, I also added 5kg of counterweight on the right hand side (3 bags of flour and a bag of sultanas until I buy a proper weight!). This is to counter the weight of the H1’s massive flywheel. This has made a huge difference to the balance and overall feel. I still need to experiment a bit with the tube pressures and their position. General consensus seems to be to start with the tubes positioned more towards the outer side (which is where I’ve got mine) until you get used to the feel of the rocker. Then, move them more towards the centre and run them at a lower pressure. Once all that’s sorted, just a few finishing touches to add (paint, anti-slip tape, mini spirit level) and build a riser block for the front wheel (I’ve been using a couple of books) then I’m good to go.

Overall, I’m pretty pleased with it (and myself!). it’s a big improvement over a static set-up. I’ve noticed that I need to engage my core a lot more than with a static set-up but I’m rewarded with a much smoother cadence. I’ve also noticed how much easier it is to work at a slightly higher cadence than normal. I usually average around 90-92 rpm but I’ve found myself working at 94-96 rpm a lot. As you would expect, comfort is also improved.

For anyone interested, here’s a List of UK suppliers I used for my build:

18mm thick plywood from B&Q. https://tinyurl.com/y2lrsquz

Pillow bearings from Amazon. Three required, sold in packs of four. https://tinyurl.com/y67s3h7k

Rod supports from eBay. Three required. Sold in packs of two. SK8 SK10 SK12 SK16 SK20 Linear Rail Shaft Bar Bearing Support CNC 3D Printer | eBay

Stainless steel rod 20mm x 600mm from Metals4U. https://tinyurl.com/y4kcpelo

Bolts, screws, nuts and washers from Amazon and local shops. M10 x 50mm for pillow bearings, M6 x 50mm for rod supports.

Wheelbarrow inner tubes from Amazon. Two required. Sold individually. https://tinyurl.com/yywkkgm9

Gripper tape (for under trainer’s feet) from Amazon. https://tinyurl.com/y675ktnu

Mini spirit levels from Amazon. Sold in packs of two. https://tinyurl.com/yyqomgzd

Paint from B&Q. https://tinyurl.com/y5qzupjt

10 Likes